
Your Apple ID?
According to Apple: "An Apple ID is your user name for everything you do with Apple: Shop the iTunes Store, enable iCloud on all your devices, buy from the Apple Online Store, make a reservation at an Apple Retail Store, access the Apple Support website, and more."
Apple's terms and conditions state that users must be 13 years of age or older to have a personal Apple ID. This means that prior to 13 years of age, the Apple ID associated with a child's iPad is the parents'/guardians' AppleID for that device, and not the student's. Consequently, we ask parents/guardians of children under the age of 13 to create and manage their child's Apple ID. Parents can decide whether to continue to manage their child's Apple ID once he/she turns 13 years of age.
With this in mind, you must use the student's school email address as the Apple ID. We want to be best able to provide technical support to our students. In order to do this we need to be able to access the emails sent to them whilst they are at the school. When you use your private email address this becomes very difficult. For example, there are times when a student forgets their password associated with their Apple ID. Apple sends the reminder to the email address registered with the Apple ID. For this reason, if the student uses their school email address we are able to provide them with the immediate support and can get the problem resolved quickly.
Additionally, the email address that is used for an Apple ID can always be changed (providing it is not an iCloud address) by visiting Apple's Manage My Apple ID page. So if you have already created an Apple ID and want to change it to your school email address, it can be easily done at this link.
Setting Up your iPad
The steps we will use to Setup the iPad are;
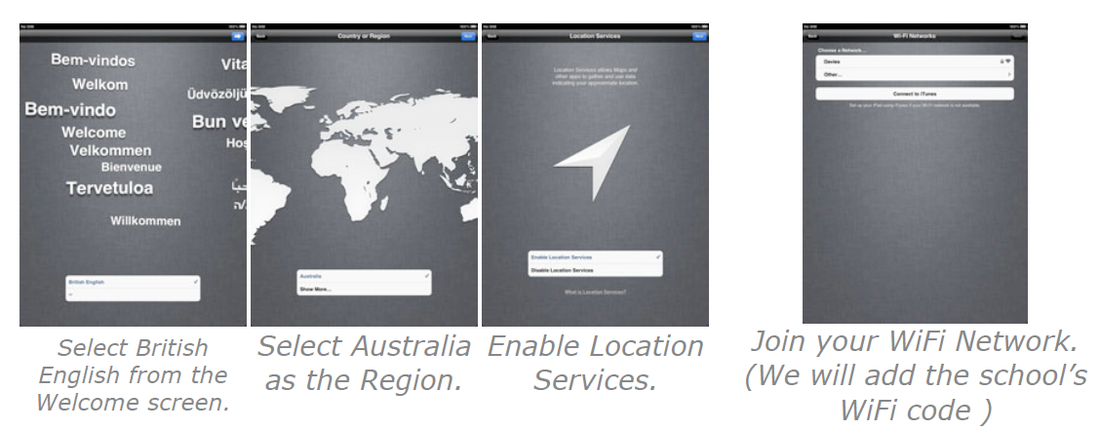
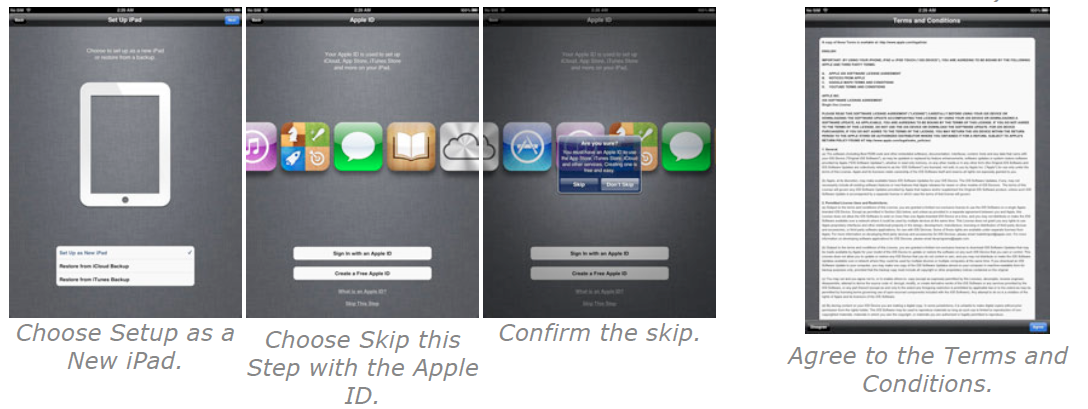
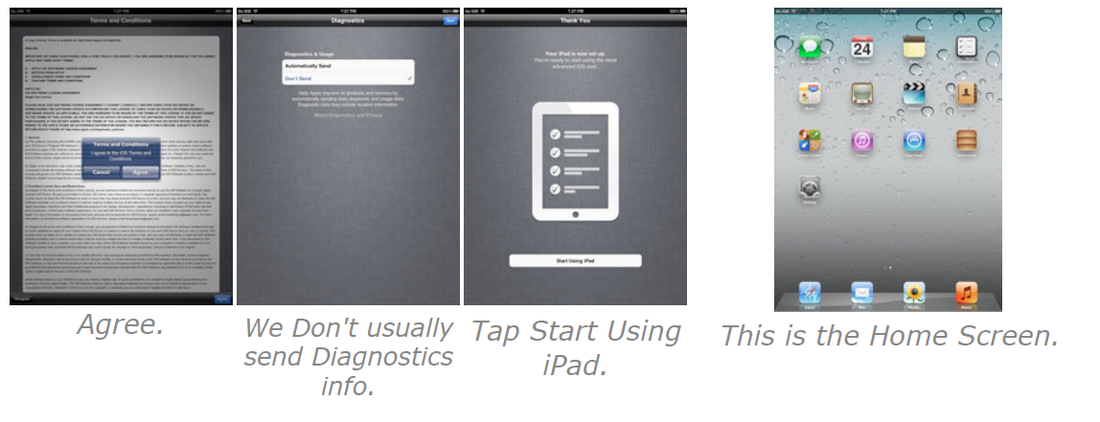
Basic out-of-the-box setup
Setup email to receive the Apple ID verification
Download a Free App as part of the Apple ID setup
Out Of The Box
Apple iPad User Manual
Open the iPad box and you will find the iPad and its USB charger. (Remember to charge the iPad when it gets below approx 10%.)
Turn on the iPad using the button on it's top-right-corner.
According to Apple: "An Apple ID is your user name for everything you do with Apple: Shop the iTunes Store, enable iCloud on all your devices, buy from the Apple Online Store, make a reservation at an Apple Retail Store, access the Apple Support website, and more."
Apple's terms and conditions state that users must be 13 years of age or older to have a personal Apple ID. This means that prior to 13 years of age, the Apple ID associated with a child's iPad is the parents'/guardians' AppleID for that device, and not the student's. Consequently, we ask parents/guardians of children under the age of 13 to create and manage their child's Apple ID. Parents can decide whether to continue to manage their child's Apple ID once he/she turns 13 years of age.
With this in mind, you must use the student's school email address as the Apple ID. We want to be best able to provide technical support to our students. In order to do this we need to be able to access the emails sent to them whilst they are at the school. When you use your private email address this becomes very difficult. For example, there are times when a student forgets their password associated with their Apple ID. Apple sends the reminder to the email address registered with the Apple ID. For this reason, if the student uses their school email address we are able to provide them with the immediate support and can get the problem resolved quickly.
Additionally, the email address that is used for an Apple ID can always be changed (providing it is not an iCloud address) by visiting Apple's Manage My Apple ID page. So if you have already created an Apple ID and want to change it to your school email address, it can be easily done at this link.
Setting Up your iPad
The steps we will use to Setup the iPad are;
Basic out-of-the-box setup
Setup email to receive the Apple ID verification
Download a Free App as part of the Apple ID setup
Out Of The Box
Apple iPad User Manual
Open the iPad box and you will find the iPad and its USB charger. (Remember to charge the iPad when it gets below approx 10%.)
Turn on the iPad using the button on it's top-right-corner.
Setting Up email : Either follow the instructions below or scroll down to view a clip which will explain how to set up mail
Accessing email while at school and home is an important responsibility for each student in maintaining communication with the school. This section will guide you through how to set up a school email account.
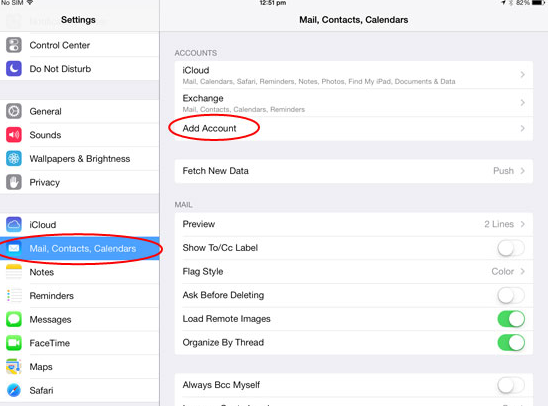
1. Open the Settings App from the Home Screen
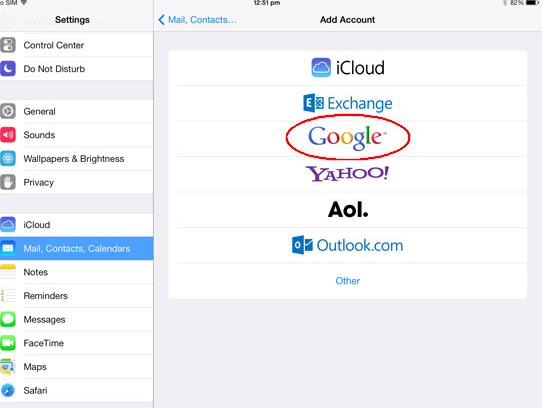
2. Tap the Mail, Contacts and Calendars menu, and tap Add Account from the right-hand pane.
Accessing email while at school and home is an important responsibility for each student in maintaining communication with the school. This section will guide you through how to set up a school email account.
1. Open the Settings App from the Home Screen
2. Tap the Mail, Contacts and Calendars menu, and tap Add Account from the right-hand pane.
3. Tap on Google
4. Enter the following details – Your Name , Your Email Address: [email protected], Your Password, Description: School Mail. Click next.
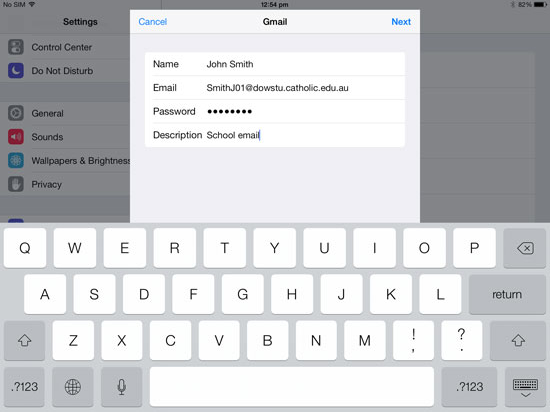
5. Capitals are just cosmetic. They are not necessary, but may be used in your email address.
6. Turn on Mail, Contacts and Calendar. If you don't already use iCloud Notes, then also turn on Notes. (These four items are on by default.) Tap Save.
6. Turn on Mail, Contacts and Calendar. If you don't already use iCloud Notes, then also turn on Notes. (These four items are on by default.) Tap Save.
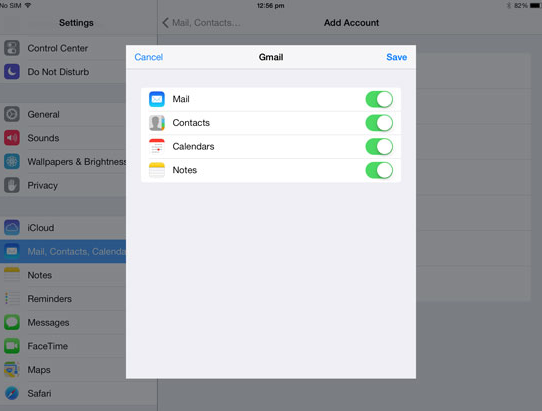
7. Return to the Home Screen and open the Mail app. Congratulations, you have now setup Email on your iPad.
View the clip below for step by step instructions on how to set up mail on your device when using the operating system iOS7
Apple ID
Apple IDs may only be created by someone over the age of 13, as stated above. It is recommended that the Parent or Guardian creates an account for the Student to use. NO CREDIT CARD details should be used when creating an Apple ID. ALL paid apps should be purchased with the school provided redemption codes or by purchasing iTunes cards (often discounted) as gifts for your child. Please use the student email address for the Apple ID.
Once logged in, you can return to the home screen where you will find the iBooks app downloading.
Apple IDs may only be created by someone over the age of 13, as stated above. It is recommended that the Parent or Guardian creates an account for the Student to use. NO CREDIT CARD details should be used when creating an Apple ID. ALL paid apps should be purchased with the school provided redemption codes or by purchasing iTunes cards (often discounted) as gifts for your child. Please use the student email address for the Apple ID.
- The simplest way to create an Apple ID is to open the App Store App and purchase a free app, in this guide we will use iBooks as an example (free app).
- Open the App Store on your iPad and do a search for iBooks, you will see a results list, tap on iBooks.
- You will be directed to the search listing, tap on the word next to the iBooks icon, tap the word 'Free', then tap the green 'Install App' button.
- You will now be prompted to Sign In, tap the Create New Apple ID button.
- Use the Australian store and click next.
- Review the Terms and Conditions and click next.
- Enter your details (using the Student School email address), including security questions and click next.
- Select None for the payment method and scroll down to the Billing Address, type your information here and tap submit.
- You will now need to access the email account you used to create your Apple ID.
- In your inbox you will have an email from Apple, if you cannot find it please check your spam or junk folder. In this email there will be a link to verify your email address, click on this.
- You will now need to log into the Apple Website, use both the email address and password you used earlier in the creation process.
- Once logged in the verification process will be complete.
- Return to the iPad and attempt to purchase the iBooks app again, you will be prompted to Sign In again, tap on Use Existing Apple ID.
- Login with the email and password that you created.
Once logged in, you can return to the home screen where you will find the iBooks app downloading.
